Introduction
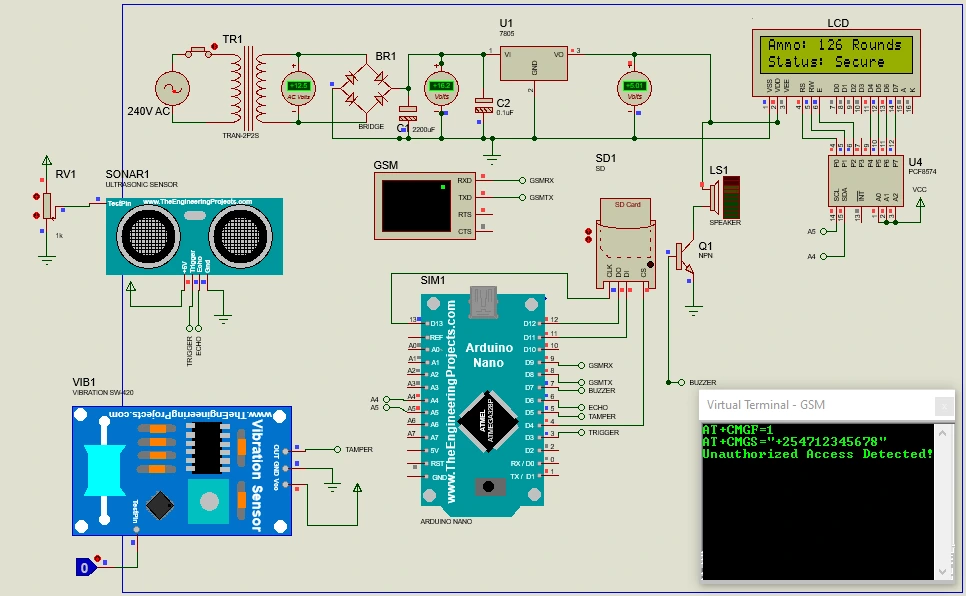
In military and security applications, monitoring ammunition levels and securing storage boxes against unauthorized access is crucial. The Smart Ammunition Box Monitoring System integrates ultrasonic and vibration sensors, an SD card module, an I2C LCD display, a GSM module, and a buzzer to ensure real-time tracking of ammunition rounds and security status.
In this blog, we will:
- Explain the working of the system
- Provide the Proteus simulation procedure
- Discuss the Arduino code implementation
Components Required
To simulate the system in Proteus, ensure you have the following components:
- Arduino Uno – The microcontroller that processes all sensor inputs and outputs.
- HC-SR04 Ultrasonic Sensor – Measures the number of ammunition rounds based on distance.
- Vibration Sensor (SW-420) – Detects unauthorized access attempts.
- 16×2 LCD (I2C Module) – Displays ammunition count and security status.
- SD Card Module – Logs ammunition count and access history.
- GSM Module (SIM800L) – Sends real-time security alerts via SMS.
- Buzzer – Alerts upon unauthorized access.
- Connecting Wires – For circuit connections.
System Operation
The system continuously monitors the number of rounds in the ammunition box using the ultrasonic sensor. It also uses a vibration sensor to detect unauthorized access.
Working Mechanism
- Ammunition Count Monitoring:
- The ultrasonic sensor sends a signal and calculates the distance between the sensor and the ammunition level.
- The Arduino converts this distance into the approximate number of rounds remaining.
- The data is displayed on the LCD screen and logged into the SD card.
- Unauthorized Access Detection:
- If the vibration sensor detects movement or impact, the system considers it unauthorized access.
- The buzzer sounds an alarm.
- The incident is recorded in the SD card.
- A GSM message is sent to military personnel alerting them of the security breach.
- Data Logging:
- All activities, including ammunition count and access logs, are stored in an SD card (log.txt file).
- Logs can be reviewed for security audits.
- Real-Time Display & Alerts:
- The LCD screen continuously updates the ammunition count and security status.
- If tampering is detected, it displays an “ALERT: Tampering!” message.
- The buzzer is activated for an alert sound.
Circuit Diagram & Pin Configuration in Proteus

For proper connections in Proteus, use the following pin configuration:
| Component | Pin Configuration |
|---|---|
| Ultrasonic Sensor (HC-SR04) | Trigger – D3, Echo – D4 |
| Vibration Sensor (SW-420) | D5 |
| Buzzer | D7 |
| GSM Module (SIM800L) | TX – D8, RX – D9 |
| SD Card Module | CS – D10, MOSI – D11, MISO – D12, CLK – D13 |
| LCD 16×2 (I2C Module) | SDA – A4, SCL – A5 |
Simulation Procedure in Proteus
To simulate the Smart Ammunition Box Monitoring System in Proteus, follow these steps:
Step 1: Add Components to the Workspace
- Open Proteus and create a new project.
- Add the following components:
- Arduino Uno
- Ultrasonic Sensor (HC-SR04)
- Vibration Sensor (SW-420)
- I2C LCD 16×2
- Buzzer
- SD Card Module
- GSM Module (SIM800L)
Step 2: Wire the Circuit
- Connect all components using the pin configuration table above.
- Ensure GND and VCC are properly connected.
- Use the I2C connections (A4, A5) for the LCD.
Step 3: Load the Arduino Code
- Copy and paste the Arduino code (provided below) into the Arduino IDE.
- Compile and upload the code.
- Export the .hex file from the Arduino IDE.
Step 4: Add the .hex File to Proteus
- Double-click the Arduino Uno in Proteus.
- Browse and load the .hex file.
Step 5: Run the Simulation
- Click Run in Proteus.
- Observe the LCD display updating the ammo count.
- Trigger the vibration sensor to test unauthorized access detection.
- Check the SD card logs.
- Monitor the buzzer and GSM alerts.
Arduino Code Implementation
#include <Wire.h>
#include <LiquidCrystal_I2C.h>
#include <SoftwareSerial.h>
#include <SD.h>

#define TRIG_PIN 3
#define ECHO_PIN 4
#define VIBRATION_PIN 5
#define BUZZER_PIN 7
#define GSM_TX 8
#define GSM_RX 9
#define SD_CS 10

LiquidCrystal_I2C lcd(0x27, 16, 2);
SoftwareSerial gsm(GSM_TX, GSM_RX);

void setup() {
    Serial.begin(9600);
    gsm.begin(9600);

    pinMode(TRIG_PIN, OUTPUT);
    pinMode(ECHO_PIN, INPUT);
    pinMode(VIBRATION_PIN, INPUT);
    pinMode(BUZZER_PIN, OUTPUT);

    lcd.begin();
    lcd.backlight();
    lcd.print("Ammo Box Ready");

    if (!SD.begin(SD_CS)) {
        lcd.setCursor(0, 1);
        lcd.print("SD Card Error!");
    } else {
        lcd.setCursor(0, 1);
        lcd.print("SD Card OK");
    }
    delay(2000);
}

void loop() {
    int ammoCount = getAmmoCount();
    bool unauthorizedAccess = digitalRead(VIBRATION_PIN);

    lcd.clear();
    lcd.setCursor(0, 0);
    lcd.print("Ammo: ");
    lcd.print(ammoCount);
    lcd.print(" Rounds");

    lcd.setCursor(0, 1);
    if (unauthorizedAccess) {
        lcd.print("ALERT: Tampering!");
        digitalWrite(BUZZER_PIN, HIGH);
        logData("Unauthorized Access!");
        sendAlert("Unauthorized Access Detected!");
    } else {
        lcd.print("Status: Secure");
        digitalWrite(BUZZER_PIN, LOW);
    }
    logData("Ammo Count: " + String(ammoCount));
    delay(2000);
}

int getAmmoCount() {
    digitalWrite(TRIG_PIN, LOW);
    delayMicroseconds(2);
    digitalWrite(TRIG_PIN, HIGH);
    delayMicroseconds(10);
    digitalWrite(TRIG_PIN, LOW);

    long duration = pulseIn(ECHO_PIN, HIGH);
    int distance = duration * 0.034 / 2;
    return map(distance, 5, 20, 100, 0);
}

void logData(String data) {
    File logFile = SD.open("log.txt", FILE_WRITE);
    if (logFile) {
        logFile.println(data);
        logFile.close();
    }
}

void sendAlert(String message) {
    gsm.print("AT+CMGS=\"+254712345678\"\r");
    gsm.print(message);
    gsm.write(26);
}
Conclusion
This Smart Ammunition Box Monitoring System enhances security and real-time monitoring using sensors, an SD card, and GSM communication. Try simulating it in Proteus and modify it for real-world implementation!

Leave a Reply